WebViewにJavascriptでAndroidのAPIをたたけるインタフェースを追加する
WebViewで表示するコンテンツからjavascript経由で、AndroidのAPIをたたけるようにするJavascriptインタフェースの追加方法について。
HTML,Javascript,css3でAndroidのアプリが作れるフレームワークのJavascriptプラグインを拡張する方法でもあります。
PhoneGap(android版)やjsWaffleなどのWebViewベースのフレームワークで端末のAPIを呼び出すために行っている方法です。Titaniumもandroid版はまだWebViewがメインだったような・・・。
PhoneGap
http://www.phonegap.com/
jsWaffle
http://d.aoikujira.com/jsWaffle/wiki/index.php?
Titanium Mobile
http://www.appcelerator.com/products/titanium-mobile-application-development/
手順概要
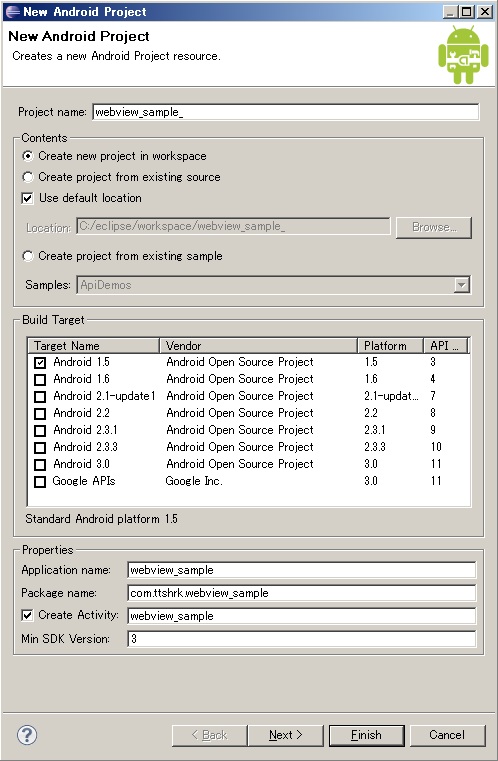
- プロジェクトを作成する
- WebViewをレイアウトに追加する
- WebViewにトップページを表示する
- WebViewにJavascriptインタフェースを追加する
- WebViewからJavascriptでAndroid APIを実行する
手順概要
WebViewをレイアウトに追加
WebViewをレイアウトに追加します。
res>layout>main.xml
<?xml version="1.0" encoding="utf-8"?>
<LinearLayout xmlns:android="http://schemas.android.com/apk/res/android"
    android:orientation="vertical"
    android:layout_width="fill_parent"
    android:layout_height="fill_parent"
    >
    <android.webkit.WebView android:id="@+id/webkitWebView1" android:layout_width="fill_parent" android:layout_height="fill_parent"></android.webkit.WebView>
</LinearLayout>
WebViewにトップページを表示
まずは、トップページに表示するHTMLファイルをassetに追加します。
- assets>www>index.html
<!DOCTYPE html>
<html>
<head>
	<meta charset="utf-8">
	<title>webview sample</title>
</head>
<body >
	<h1>webvew sample</h1>
	トップページ
</body>
</html>
次に、WebViewにトップページを指定します。
- webview_sample.java
package com.ttshrk.webview_sample;

import android.app.Activity;
import android.os.Bundle;
import android.webkit.WebView;

public class webview_sample extends Activity {
	WebView webView;

    /** Called when the activity is first created. */
    @Override
    public void onCreate(Bundle savedInstanceState) {
        super.onCreate(savedInstanceState);
        setContentView(R.layout.main);

        // webviewの取得
        webView = (WebView)findViewById(R.id.webkitWebView1);

        // トップページの表示
        webView.loadUrl("file:///android_asset/www/index.html");
    	try {
    		webView.requestFocus();
    	} catch (Exception e) {
    	}

    }
}
ここでアプリを起動すると、指定したHTMLファイルが表示されると思います。
WebViewにJavascriptインタフェースを追加する
端末のAndroidのAPIを呼び出すJavascriptインタフェースを作成します。(追加するクラスのタイプはObject型です。)
追加したオブジェクトのpublicなメソッドをJavascriptから呼び出すことができるようになります。
- SampleWebViewInterface.java
package com.ttshrk.webview_sample;

import android.app.Activity;
import android.content.Context;
import android.os.Vibrator;
import android.util.Log;

class SampleWebViewInterface {
	Activity activity;

	public SampleWebViewInterface(Activity activity) {
		this.activity = activity;
	}

	/**
	 * log出力
	 * @param msg
	 */
	public void log(String msg) {
		Log.d("SampleWebViewInterface", msg);
	}

	/**
	 * バイブレーション 0.5秒震える
	 */
	public void vibrate() {
		Vibrator vibrator = (Vibrator) activity.getSystemService(Context.VIBRATOR_SERVICE);
        vibrator.vibrate(500);
	}
}
WebViewのjavascriptを有効にし、インタフェースの登録を行います。
- webview_sample.java
package com.ttshrk.webview_sample;

import android.app.Activity;
import android.os.Bundle;
import android.webkit.WebSettings;
import android.webkit.WebView;
import android.webkit.WebSettings.LayoutAlgorithm;

public class webview_sample extends Activity {
    WebView webView;

    /** Called when the activity is first created. */
    @Override
    public void onCreate(Bundle savedInstanceState) {
        super.onCreate(savedInstanceState);
        setContentView(R.layout.main);

        // webViewの取得
        webView = (WebView)findViewById(R.id.webkitWebView1);

        // webViewの設定
        WebSettings setting = webView.getSettings();
        setting.setJavaScriptEnabled(true);	// javascript有効
        setting.setJavaScriptCanOpenWindowsAutomatically(true);	// window.open()有効
        setting.setLayoutAlgorithm(LayoutAlgorithm.NORMAL);	// レイアウト設定
        setting.setBuiltInZoomControls(false);	// ズーム不可

        // javascriptインタフェースの追加。
        // javascriptから_sampleというオブジェクトを扱えるようになります
        webView.addJavascriptInterface(new SampleWebViewInterface(this), "_sample");

        // トップページの表示
        webView.loadUrl("file:///android_asset/www/index.html");
        try {
            webView.requestFocus();
        } catch (Exception e) {
        }
    }
}
バイブレーション機能を使うため、AndroidManifest.xmlのパーミッションを有効にします。
- AndroidManifest.xml
<?xml version="1.0" encoding="utf-8"?>
<manifest xmlns:android="http://schemas.android.com/apk/res/android"
      package="com.ttshrk.webview_sample"
      android:versionCode="1"
      android:versionName="1.0">
    <uses-sdk android:minSdkVersion="3" />
    <!-- vibrate有効 -->
    <uses-permission android:name="android.permission.VIBRATE" />

    <application android:icon="@drawable/icon" android:label="@string/app_name" android:debuggable="true">
        <activity android:name=".webview_sample"
                  android:label="@string/app_name">
            <intent-filter>
                <action android:name="android.intent.action.MAIN" />
                <category android:name="android.intent.category.LAUNCHER" />
            </intent-filter>
        </activity>

    </application>
</manifest>
WebViewからJavascriptでAndroid APIを実行する
WebViewに表示するHTMLファイルに_sampleを呼び出すコードを追加します。
<!DOCTYPE html>
<html>
<head>
	<meta charset="utf-8">
	<title>webview sample</title>
</head>
<body >
	<h1>webvew sample</h1>
	トップページ

	<script>
		// logデバッグログ表示
		_sample.log("test");
		// 振動
		_sample.vibrate();
	</script>
</body>
</html>
以上で終了です。
アプリを起動すると、端末が振動すると思います。
実端末で開発・デバッグする
Windows7(64bit)でAndroidの開発環境を構築した時、実機でデバッグできるようにする手順を勘違いしていたのでメモ。
Androidデバイス(実機)が64bit環境のためうまく認識されないと思っていましたが、ドライバの指定が必要なだけでした。
手順
- ドライバのダウンロード
必要なデバイスドライバをダウンロードします。
googleやLG、Samsung、Sonyの場合は、androidのSDK Managerでダウンロードできます。
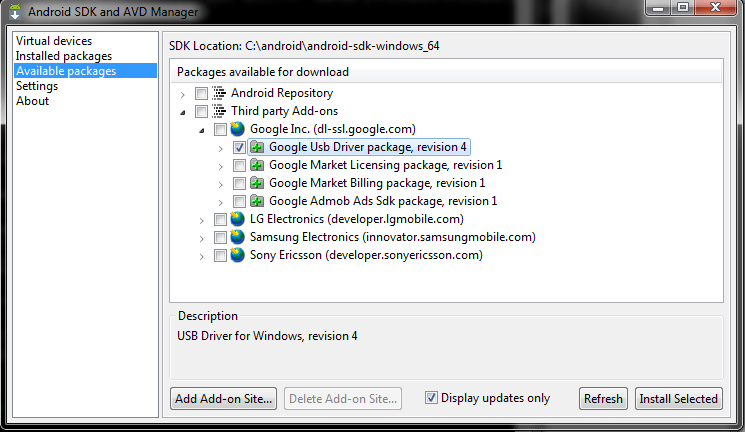
上記以外のメーカーの端末はそれぞれ専用のページからダウンロードできます。
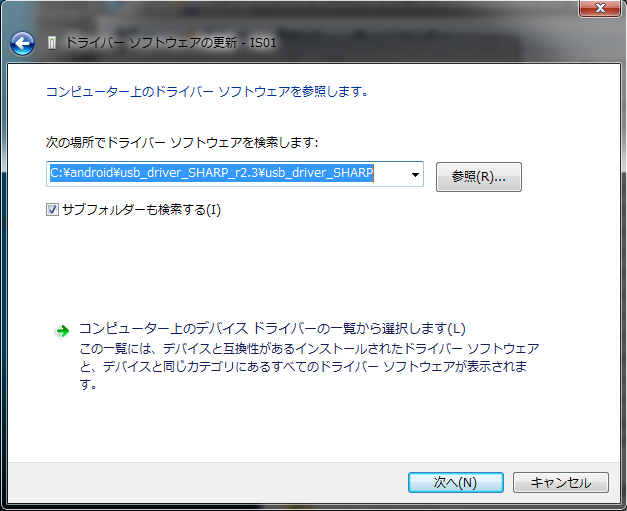
ここでは、IS01用のドライバ「usb_driver_SHARP_r2.3.zip」をここよりダウンロードして適当なところに解凍しておきます。
実記をUSBで接続したときにデバッグモードになるように設定します。
設定>アプリケーション>開発>USBデバッグ
androidデバイスをUSBで接続し、コントロールパネル>デバイスマネージャを表示します。
ほかのデバイスといったカテゴリに表示されているandroid端末を選択し、プロパティを表示します。

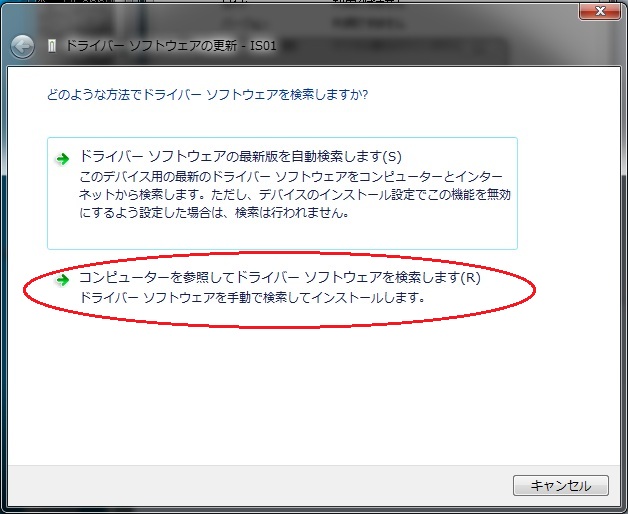
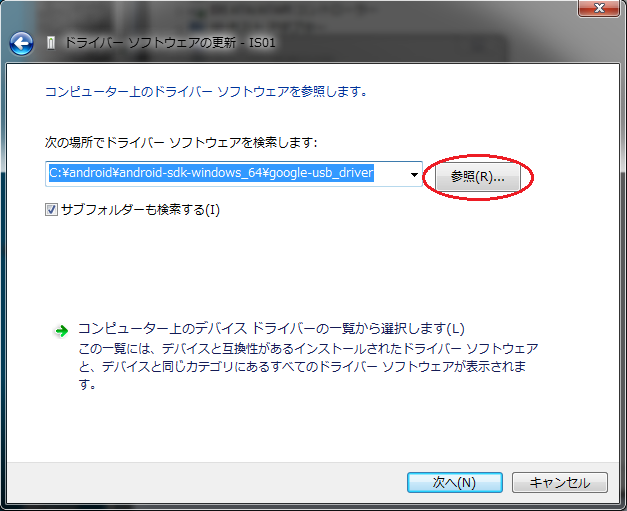
ドライバの更新を選択し、ダウンロードしたデバイスドライバを指定します。
インストールが完了すると、「Android Composite ADB Interface」として認識されるようになります。
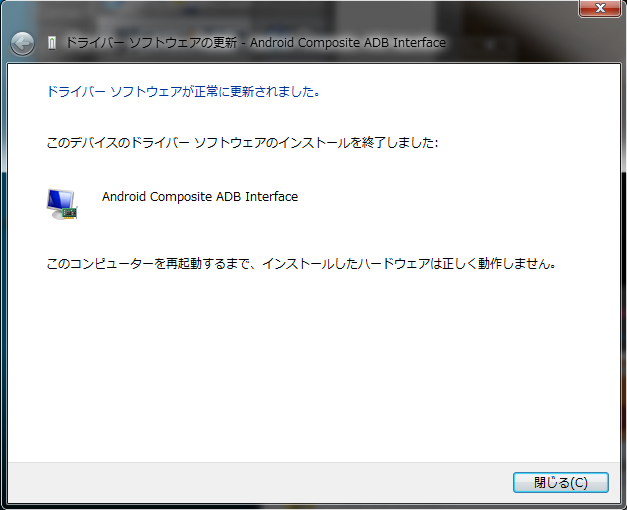
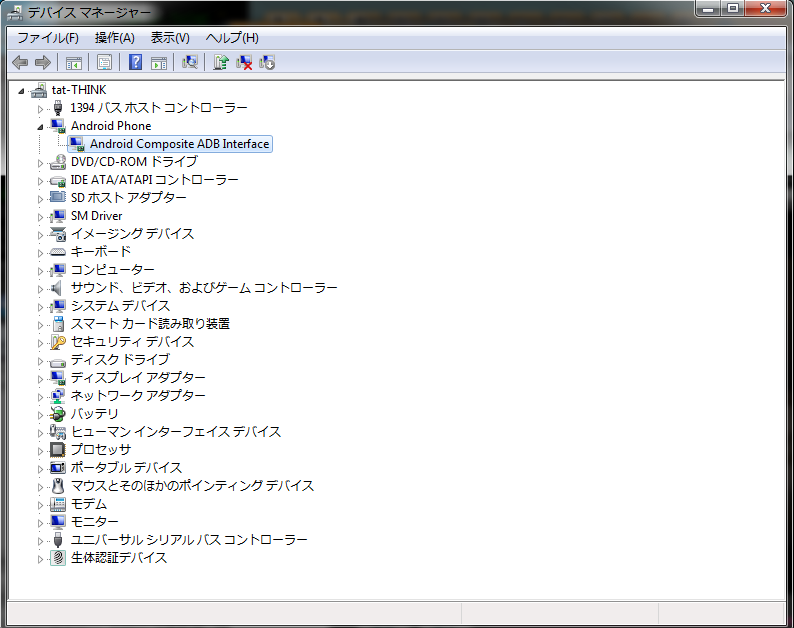
最後にADBツールでデバイスが認識できるかどうかチェックします。

以上で、完了です。
UIScrollViewサンプル
UIScrollViewのサンプル。
xcodeがversion4.0になって少し使い方が変わったため、その使い方もメモしておきます。
手順概要
xcode 4.0で作業を行う場合です。とりあえず、iphone用のファイルだけいじります。
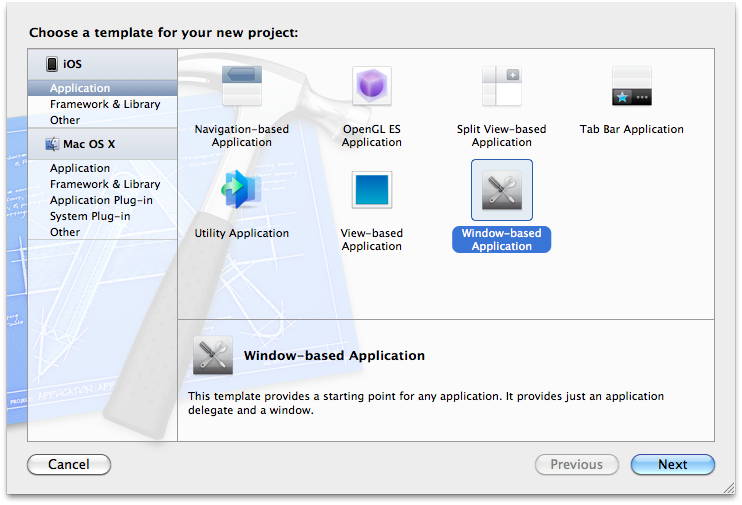
- window baseのアプリケーションを作成します
- UIScrollViewを追加します
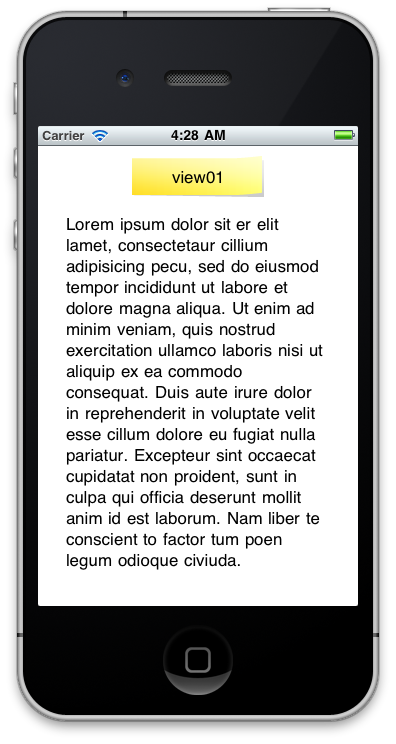
- UIScrollViewに表示するView(View01、View02)を作成します
- 追加したUIScrollViewにView(View01、View02)を設定します
手順詳細
window baseのアプリケーションの作成
File > New > New Projectからwindow-based Applicationを作成します。
今回は、適当にscrollview_testといったプロジェクト名にしました。
UIScrollViewを追加
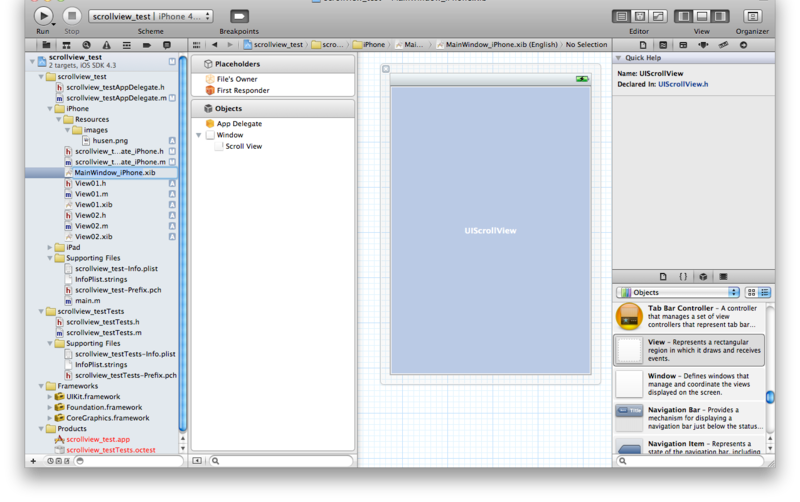
- xibファイルの編集
MainWindow_iPhone.xibを編集して、UIScrollViewを追加します。
- IBOutletの追加
scrollview_testAppDelegate_iPhone.h、scrollview_testAppDelegate_iPhone.mを編集して、UIScrollViewを追加します。
scrollview_testAppDelegate_iPhone.h
#import <UIKit/UIKit.h>
#import "scrollview_testAppDelegate.h"

@interface scrollview_testAppDelegate_iPhone : scrollview_testAppDelegate {
    IBOutlet UIScrollView* myScrollView;
}

@property(nonatomic, retain) UIScrollView* myScrollView;

- (UIView*)createViewByType:(int)type withFrame:(CGRect)rect;

@end
scrollview_testAppDelegate_iPhone.m
#import "scrollview_testAppDelegate_iPhone.h"

@implementation scrollview_testAppDelegate_iPhone

@synthesize myScrollView;

- (void)dealloc
{
    [myScrollView release];
	[super dealloc];
}

@end
表示するView(View01、View02)を作成
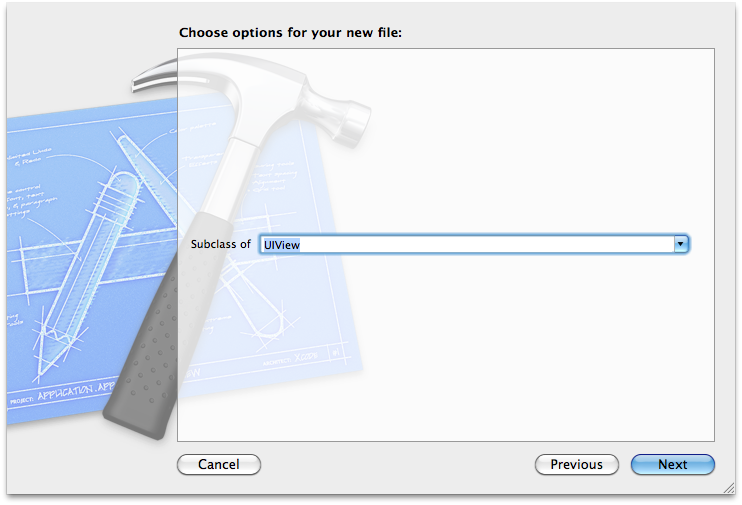
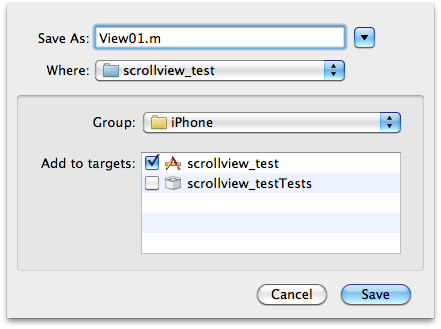
- View01.h,View01.mの追加
File > New > New FileからView01.mを追加します。
- View01.h,View01.mの編集
View01.h、View01.mを編集します。
View01.h
#import <UIKit/UIKit.h>


@interface View01 : UIView {
    IBOutlet UILabel* label;
    IBOutlet UIImageView* imageView;
    IBOutlet UITextView* textView;
}

@property(nonatomic, retain) UILabel* label;
@property(nonatomic, retain) UIImageView* imageView;
@property(nonatomic, retain) UITextView* textView;

@end
View01.m
#import "View01.h"


@implementation View01

@synthesize label, imageView, textView;

- (id)initWithFrame:(CGRect)frame
{
    self = [super initWithFrame:frame];
    if (self) {
        // Initialization code
    }
    return self;
}

/*
// Only override drawRect: if you perform custom drawing.
// An empty implementation adversely affects performance during animation.
- (void)drawRect:(CGRect)rect
{
    // Drawing code
}
*/

- (void)dealloc
{
    [label release];
    [imageView release];
    [textView release];
    [super dealloc];
}

@end
- View01.xibの追加
File > New > New FileからView01.xibを追加します。
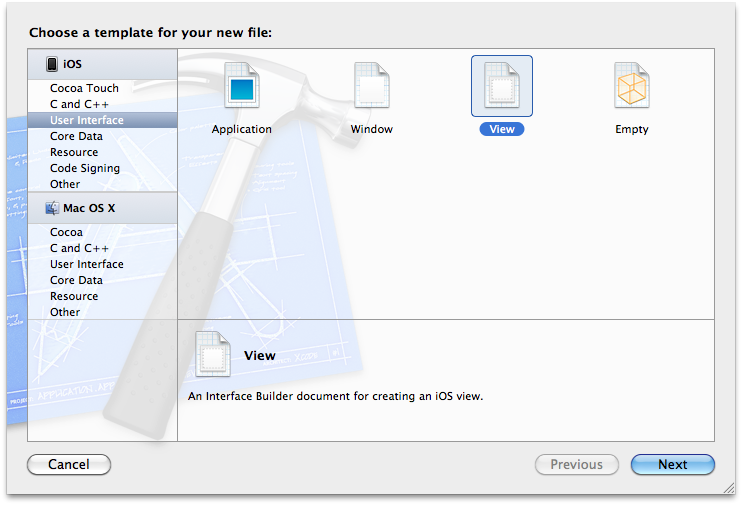
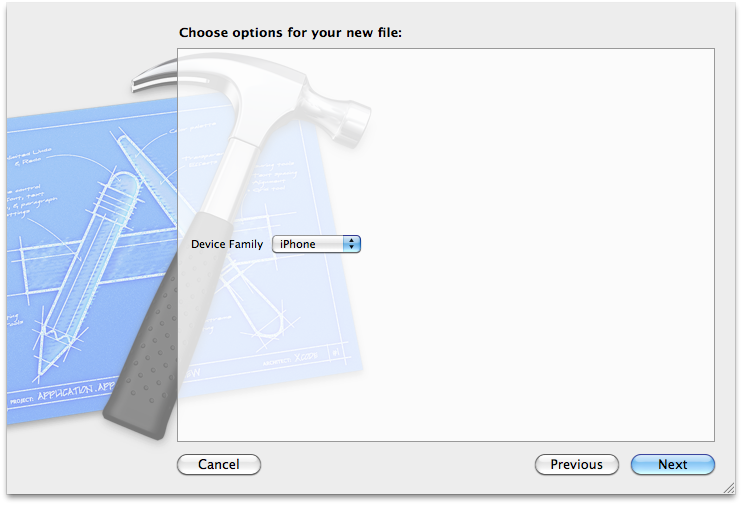
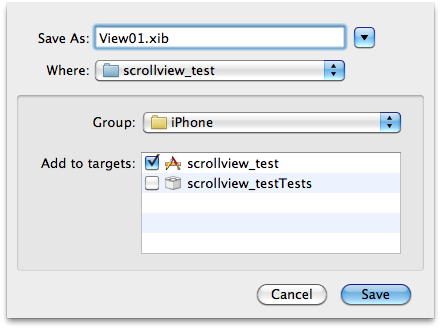
View01.xibを編集します。
まずは、Objectsに設定されているViewを削除します。
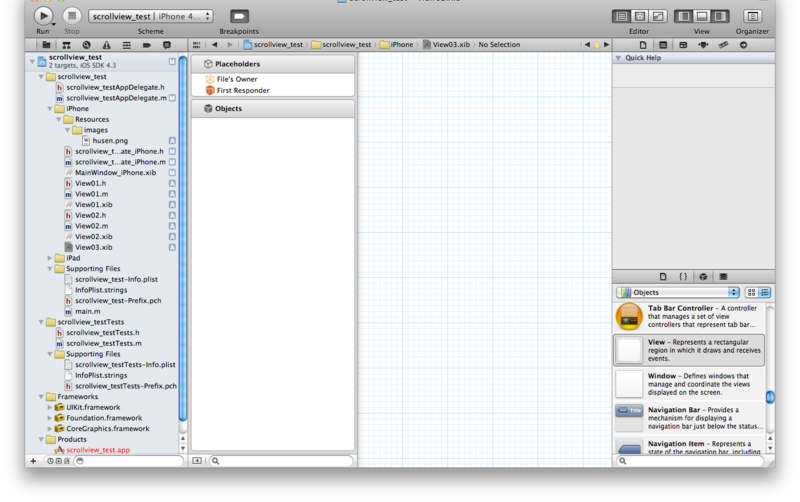
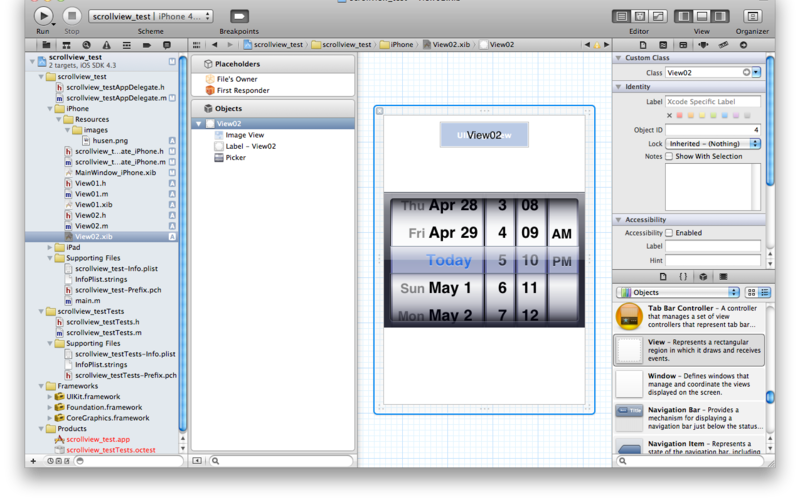
その後、新しくUIViewを設定し、UILabel,UIImageView,UITextViewを追加します。
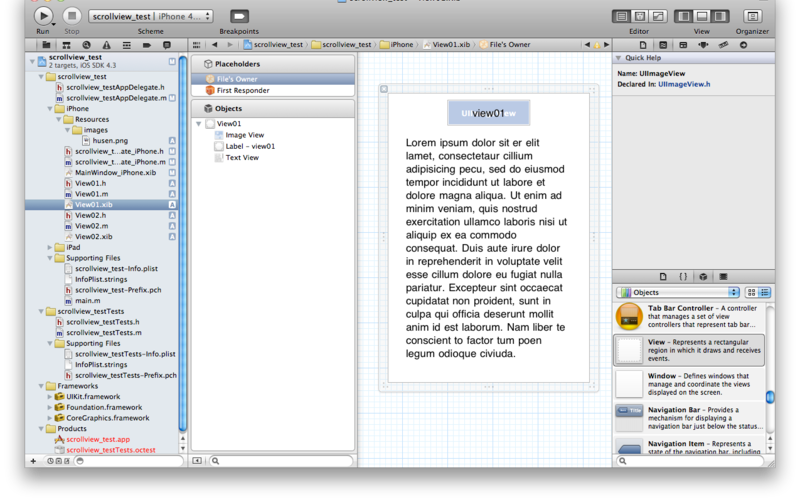
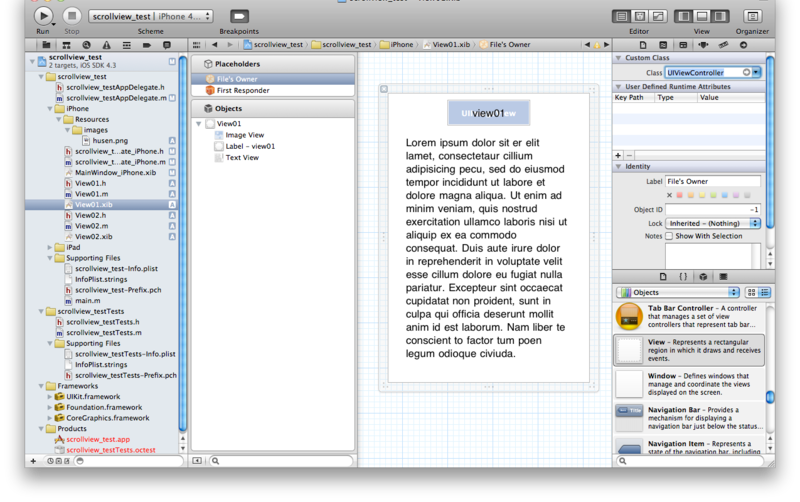
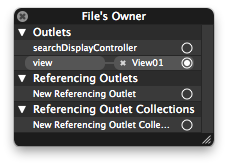
View01.xibのFile's OwnerのCustom ClassにUIViewControllerを設定します。
View01.xibのObjectsのViewのCustom ClassにView01を設定します。
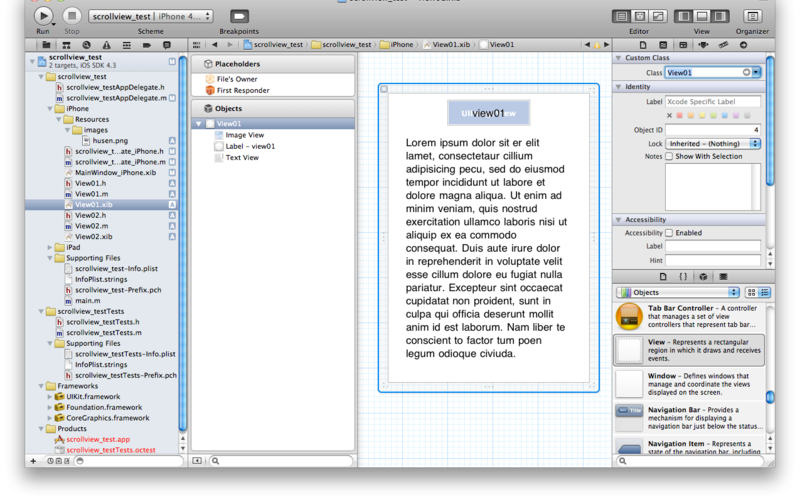
View01のlabel, imageView, textViewを設定します。
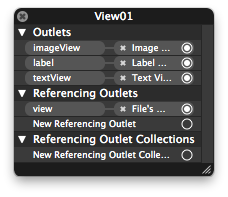
File's OwnerのviewにView01を設定します。
- View02.h 、View02.m、View02.xibの追加
View02も同様に作成します。
View02.h
#import <UIKit/UIKit.h>

@interface View02 : UIView {
    IBOutlet UILabel* label;
    IBOutlet UIImageView* imageView;
    IBOutlet UIDatePicker* datePicker;
}

@property(nonatomic, retain) IBOutlet UILabel* label;
@property(nonatomic, retain) IBOutlet UIImageView* imageView;
@property(nonatomic, retain) IBOutlet UIDatePicker* datePicker;

@end
View02.m
#import "View02.h"

@implementation View02

@synthesize label, imageView, datePicker;

- (id)initWithFrame:(CGRect)frame
{
    self = [super initWithFrame:frame];
    if (self) {
        // Initialization code
    }
    return self;
}

/*
// Only override drawRect: if you perform custom drawing.
// An empty implementation adversely affects performance during animation.
- (void)drawRect:(CGRect)rect
{
    // Drawing code
}
*/

- (void)dealloc
{
    [label release];
    [imageView release];
    [datePicker release];
    [super dealloc];
}

@end
追加したUIScrollViewにView(View01、View02)を設定
scrollview_testAppDelegate_iPhone.m
#import "scrollview_testAppDelegate_iPhone.h"
#import "View01.h";
#import "View02.h";

@implementation scrollview_testAppDelegate_iPhone

@synthesize myScrollView;

- (BOOL)application:(UIApplication *)application didFinishLaunchingWithOptions:(NSDictionary *)launchOptions
{
    if(NO == [super application:application didFinishLaunchingWithOptions:launchOptions])
        return NO;

    CGFloat w = myScrollView.frame.size.width;
	CGFloat h = myScrollView.frame.size.height;
	[myScrollView setContentSize:CGSizeMake(w*2, h)];

    [myScrollView addSubview:[self createViewByType:0 withFrame:CGRectMake(0, 0, w, h)]];
    [myScrollView addSubview:[self createViewByType:1 withFrame:CGRectMake(w, 0, w*2, h)]];

    return YES;
}

- (UIView*)createViewByType:(int)type withFrame:(CGRect)rect {

    switch(type) {
        case 0:
        {
            // create view
            UIViewController* viewController = [[UIViewController alloc] initWithNibName:@"View01" bundle:nil];
            View01* view = (View01*)viewController.view;
            [viewController release];

            // view setting
            [view setFrame:rect];
            view.imageView.image = [UIImage imageNamed:@"husen.png"];

            return view;
        }
        case 1:
        {
            // create view
            UIViewController* viewController = [[UIViewController alloc] initWithNibName:@"View02" bundle:nil];
            View02* view = (View02*)viewController.view;
            [viewController release];

            // view setting
            [view setFrame:rect];
            view.imageView.image = [UIImage imageNamed:@"husen.png"];

            return view;
        }
    }

    return nil;
}

- (void)dealloc
{
    [myScrollView release];
	[super dealloc];
}

@end
Postgresqlレプリケーション ストリーミングレプリケーション構築メモ
Postgresql9 トリーミングレプリケーション構築メモ
本家
http://www.postgresql.jp/document/current/html/install-procedure.html
こちらのスライドがわかりやすい
http://www.slideshare.net/uptimejp/5postgresql
インストール
インストールモジュール
- gcc(4.1.2-14.el5)
- readline(5.1-1.1)
- readline-devel(5.1-1.1)
- zlib-devel(1.2.3-3)
- postgresql(9.0.3)
依存モジュールインストール
たぶん必要ないです。
- 依存モジュールのインストール
yum install gcc
yum install readline
yum install readline-devel
yum install zlib-devel
postgresqlインストール
ソースからインストール
- postgresqlインストール
cd /usr/local/src
wget ftp://ftp.postgresql.org/pub/v9.0.3/postgresql-9.0.3.tar.gz
tar zxf postgresql-9.0.3.tar.gz
cd postgresql-9.0.3
./configure --enable-thread-safety
make
su -

cd /usr/local/src/postgresql-9.0.3
make install
exit
- パス設定
cat >> ~/bashrc
PG=/usr/local/pgsql
export PATH=$PATH:$PG/bin
export MANPATH="$MANPATH":$PG/man
export PGLIB=$PG/lib
export PGDATA=$PG/data
# ctrl+D

source ~/.bashrc
- DB初期化
# 文字コードが utf-8の場合
initdb --no-locale --encoding=UTF-8
プライマリサーバ、スタンバイサーバともにインストールしてください。
ストリーミングレプリケーション構成設定
プライマリサーバ、スタンバイサーバで構成が異なりますので、注意してください。
ストリーミングレプリケーション環境を構築してからデータを投入するのであれば問題ありませんが、既にデータのあるDBを同期する場合(たいていの場合はそうだと思いますが)、プライマリサーバのベースバックアップとアーカイブログが必要になるので、ご注意ください。
- 構成イメージ
- masterサーバ: プライマリサーバ
- slaveサーバ: スタンバイサーバ(ホットスタンバイ)
- 手順概要
(1)プライマリサーバのレプリケーション構成の設定
(2)プライマリサーバの起動(設定反映)
(3)プライマリサーバのベースバックアップ取得
(4)スタンバイサーバのレプリケーション構成の設定
(5)スタンバイサーバの起動(レストアの開始)
プライマリサーバ設定
レプリケーション構成の設定
- postgresql.confの編集
wal_level = hot_standby
hot_standby = off
archive_mode = on
archive_command = 'test ! -f /path/to/archive_log/%f && /bin/cp %p /path/to/archive_log/%f'
max_wal_senders = 1  # スタンバイの数だけ必要
- WALストリーム接続許可設定追加
接続を許可するスタンバイサーバを指定します。
vi /usr/local/pgsql/data/pg_hba.conf
host replication postgres 192.168.0.101/32 trust
適当なところに作成してください
mkdir -p /path/to/archive_log
- postgresqlスタート
pg_ctl start
プライマリサーバのベースバックアップの取得
プライマリサーバにDBが存在する場合、ベースバックアップをスタンバイにコピーする作業が必要です。
- ベースバックアップ取得
# pg_start_backup
psql -c "SELECT pg_start_backup('REPLICATION SNAPSHOT')"

# ベースバックアップ取得
rsync -av --delete /usr/local/pgsql/data --exclude=pg_xlog --exclude=data/postmaster.pid /path/to/basebackup/

# pg_stop_backup
psql -c "SELECT pg_stop_backup()"
スタンバイサーバに、ベースバックアップをコピーし、restore_commandでアーカイブログを取得できるようにしておいてください。
スタンバイ側の設定
- postgresql.confの編集
vi /usr/local/pgsql/data/postgresql.conf
archive_command = 'test ! -f /path/to/archive_log/%f && /bin/cp %p /path/to/archive_log/%f'
hot_standby = on
max_standby_archive_delay = 30s
max_standby_streaming_delay = 30s
適当なところに作成してください
mkdir -p /path/to/archive_log
- recovery.conf編集
vi /usr/local/pgsql/data/recovery.conf
standby_mode = 'on'
primary_conninfo = 'host=192.168.0.100 port=5432 user=postgres'
restore_command = 'scp 192.168.0.100:/path/to/archive_log/%f %p'
trigger_file = '/tmp/trigger_file'
archive_cleanup_command = 'pg_archivecleanup /path/to/archive_log %r'
- スタンバイサーバ起動
pg_ctl start
ベースバックアップからのレストアが起動し、WALの適用終了後、ストリーミングレプリケーションが動作します。
Postgresqlレプリケーション ストリーミングレプリケーション仕組みメモ
Postgresqlストリーミングレプリケーション(S/R)仕組みメモ
ここでは、Postgresqlのストリーミングレプリケーションについて、簡単に仕組みと種類をメモしておきます。
参考サイト
日本語訳ドキュメント(9.0.2)
http://www.postgresql.jp/document/pg902doc/html/index.html
仕組みについて正しい情報はここ
http://www.interdb.jp/techinfo/pg_sr/index.html
こちらのスライドがわかりやすい
http://www.slideshare.net/uptimejp/5postgresql
レプリケーションの種類
Postgresql(>=9.0.2)のとき。
- 表記について
下記の表記は同じものです。
-
- マスタサーバ、マスタノード、プライマリノードなど
- スレイブサーバ、セカンダリノード、スタンバイサーバなど
設定の違い
- ファイルベースのログシッピング
recovery.conf
standby_mode = 'on'
restore_command = 'cp /path/to/archive/%f %p'
trigger_file = '/path/to/trigger_file'
archive_cleanup_command = 'pg_archivecleanup /path/to/archive %r'
- ストリーミングレプリケーション
primary_conninfoを設定する
recovery.conf
standby_mode = 'on'
primary_conninfo = 'host=192.168.1.50 port=5432 user=foo password=foopass'
restore_command = 'cp /path/to/archive/%f %p'
trigger_file = '/path/to/trigger_file'
archive_cleanup_command = 'pg_archivecleanup /path/to/archive %r'
WALストリームを送信する接続許可設定を追加(プライマリ側)
これで、セカンダリ側のwal receiverから接続要求がくると、プライマリ側のwal senderが起動します
pg_hba.conf
host replication foo 192.168.1.100/32 md5
- ストリーミングレプリケーション(ホットスタンバイ)
primary_conninfoを設定する(セカンダリ側)
recovery.conf
standby_mode = 'on'
primary_conninfo = 'host=192.168.1.50 port=5432 user=foo password=foopass'
restore_command = 'cp /path/to/archive/%f %p'
trigger_file = '/path/to/trigger_file'
archive_cleanup_command = 'pg_archivecleanup /path/to/archive %r'
WALストリームを送信する接続許可設定を追加(プライマリ側)
これで、セカンダリ側のwal receiverから接続要求がくると、プライマリ側のwal senderが起動します
pg_hba.conf
host replication foo 192.168.1.100/32 md5
ホットスタンバイ
postgresql.conf
wal_level = hot_standby
hot_standby = on    # プライマリ側:off セカンダリ側:on
recovery.conf
| standby_mode | 'on'を設定することでアーカイブWALファイルの最後に到達してもリカバリを終了せず、新しいWALセグメントの取得を継続します |
| primary_conninfo | wal receiverの接続設定です。pqb形式でプライマリサーバを指定します |
| restore_command | 起動時にレストアするアーカイブログを指定します。 |
| trigger_file | trigger_fileで指定したファイルを置くことで、fail over(ストリーミングレプリケーションをやめる)します。fail overしないのであれば不要 |
| archive_cleanup_command | wal receiverで取得したWALで、不要になったものを破棄するコマンドを指定します |
ストリーミングレプリケーションについて
内容
- 通常時のストリーミングレプリケーションの動作
wal senderとwal receiverの動作
- ノードを追加した時のセカンダリサーバの動作のイメージ
ベースバックアップからのレストアと、レストア終了後のスタンバイサーバとしての動作
ストリーミングレプリケーションのだいたいの動き
- レプリケーションイメージ(ホットスタンバイ)
便宜的にWALログファイルを受け取るように書いてありますが、実際はTCP接続経由のWALレコードのストリーミングデータで送受信されます。
(この書き方にしたのは、スタンバイサーバの動きがPITRのイメージに近い(ように見えた)からですが・・・)

| wal sender | コミットされたWALレコードをTCP接続経由で送信する。セカンダリサーバのwal receiverと接続する。 |
| wal receiver | 更新されたWALレコードをTCP接続経由で受信する。プライマリサーバのwal senderと接続する。 |
| startup process | 受け取ったWALを適用します。(リカバリ処理を行うプロセスと同じ) |
セカンダリノードを追加するときの動き
- レストア→ストリーミングレプリケーションのイメージ
運用中のサーバにセカンダリノードを追加する場合、ベースバックアップからのレストア処理を行った後、そのままストリーミングレプリケーションに移行します。
ここではそのイメージを載せておきます。
- レストア中
ベースバックアップにプライマリノードのアーカイブログを適用していきます。

- ストリーミングレプリケーションに移行
アーカイブログの適用が終了したら、ストリーミングレプリケーションに移行します。

recovery.confのstandby_modeが'on'に設定してあると、アーカイブWALファイルの最後に到達してもリカバリを終了せず、新しいWALセグメントの取得を継続します。
リカバリ処理を終了(フェイルオーバー)するには、trigger_fileを置く事で行えます。
pgpool-IIで負荷分散めも その2 pgpool-ha編
PostgreSQLのツール、pgpool-IIとpgpool-ha、heartbeatで負荷分散、高可用構成でサービスを構築するメモの2
前回の構成だと、pgpool-IIサーバがシングルポイントになってしまうため、heartbeat2.0とpgpool-HAを使って冗長構成にします。
参考
pgpool-HAとは
pgpool-haの本家
http://pgpool.sraoss.jp/index.php?pgpool-HA
heartbeatをつかってpgpool-IIの高可用な構成を組むときに使用する制御スクリプト。このメモのきもはどちらかというと、heartbeatのほうです。
heartbeatとは
heartbeatについてです。
http://www.linux-ha.org/
本家ユーザガイド
http://www.linux-ha.org/ClusterInformationBase/UserGuide
DRBDのサイトですが、heartbeat、CRMについてよくまとまっていて、ここを読むとかなりわかります。
http://www.drbd.jp/users-guide/ch-heartbeat.html
構成
概要
- 構築イメージ
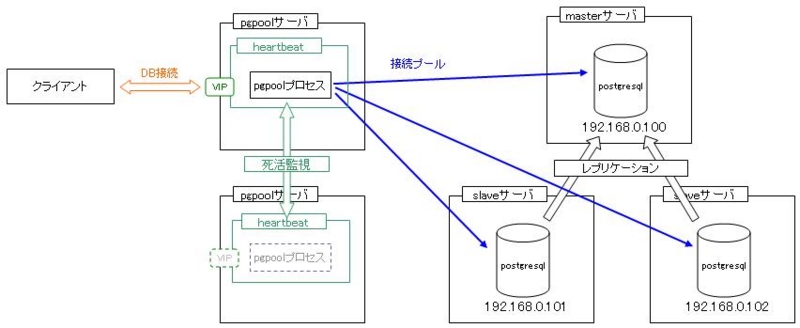
前回のpgpool-IIによる負荷分散構成ではpgpool-IIサーバがダウンした場合、サービスが停止してしまいます。そのため、pgpool-IIサーバの冗長化が必要ですが、ここではheartbeat2.0(とCRM(Cluster Resource Manager))とpgpool-HAを使用して構築を行います。
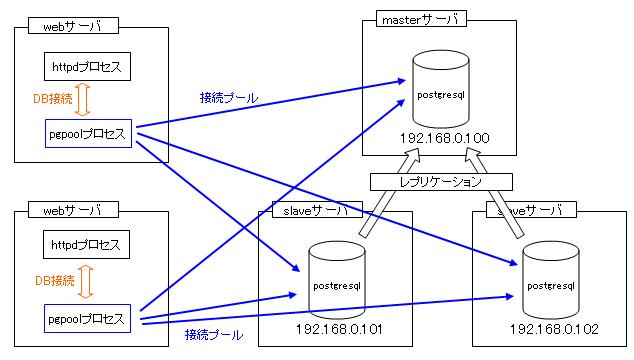
ほかの構築方法としては、下記イメージのように、Webサーバにpgpool-IIをたててpgpool-IIがダウンしても、サービス全体がダウンしないようにする方法があります。
- webサーバにpgpool-IIをたてる場合
- heatbeatとpgpool-HAの役割
プロセスやサーバの監視はheartbeatを使って行います。pgpool-HAには、pgpoolの監視スクリプト,起動スクリプト,終了スクリプトが記述されていて、CRM構成のheartbeat2.0で実行する事でpgpoolの監視、再起動、系切り替えを行います。
インストール
postgresql、pgpool-IIについてはこちらを参考にしてください。
- libnetインストール
heartbeatに必要です。
http://libnet.sourceforge.net/
cd /usr/local/src
wget ftp://ftp.eenet.ee/pub/gentoo/distfiles/libnet-1.1.2.1.tar.gz
tar zxf libnet-1.1.2.1.tar.gz
cd libnet
./configure --prefix=/usr/local
make
su -

cd /usr/local/src/libnet
make install
exit
- heartbeat
http://linux-ha.org/wiki/Download
グループ(haclient)もついでに追加しておきます。
su -
groupadd -g 1000 haclient
useradd -g haclient -s /sbin/nologin -d / -M hacluster
exit

cd /usrlocal/src
wget http://hg.linux-ha.org/lha-2.1/archive/tip.tar.bz2
tar jxf Heartbeat-STABLE-2-1-STABLE-2.1.4.tar.bz2
cd Heartbeat-STABLE-2-1-STABLE-2.1.4
./ConfigureMe configure
make
su -

cd /usr/local/src/Heartbeat-STABLE-2-1-STABLE-2.1.4
make install
exit
- pgpool-HA
http://pgfoundry.org/projects/pgpool/からダウンロード
cd /usr/local/src
wget http://pgfoundry.org/frs/download.php/2871/pgpool-ha-1.3.tar.bz2
tar jxf pgpool-ha-1.3.tar.bz2
cd pgpool-ha-1.3
./configure
cd ./src
make
su -

cd /usr/local/src/pgpool-ha-1.3/src
make install
HA構成設定
HA構成詳細
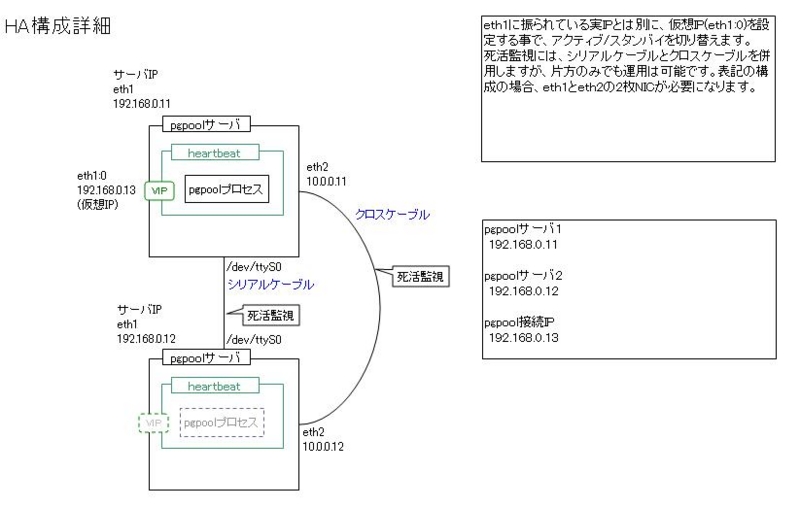
- pgpool-ha構成詳細図
- pgpoolサーバの切り替えについて
待機サーバからheartbeatによる死活監視によりアクティブなpgpoolサーバのダウンが検出されると、pgpool接続で使用する仮想IP(VIP)が待機サーバに割り当てられ、pgpoolプロセスが起動されます。クライアントからはpgpoolに接続するIPの変更はないため、瞬間的にアクセスが途切れるだけですむようになります。
- heartbeatの監視方法について
heartbeatはUDPベースの通信プロトコルを使用し、ノードの可用性を定期的にチェックします。今回は以下の通信方法でチェックします。
-
- IPユニキャスト
eth2(10.0.0.11)のUDPポート694番を使用します。
/dev/ttyS0(baud:19200)を使用します。
また、pgpool-haをheartbeat2.0で使用する場合、CRM構成モードでのheartbeatクラスタの実行が必要です。CRM構成については以下に。
- heartbeat CRM構成
heartbeatクラスタには、次のような設定ファイルが必要です。
| /etc/ha.d/ha.cf | グローバルクラスタ構成 |
| /etc/ha.d/authkeys | ノードの相互認証用キー |
CRMクラスタの場合は、heartbeat構成の一部が次の設定ファイルに記述されます。
/etc/ha.d/ha.cf
crm yes # trueでもよい
/etc/ha.d/authkeys
上記以外のクラスタ構成は、 CIB (Cluster Information Base: クラスタ情報ベース)に格納されています。
- クラスタ情報ベース
クラスタ情報ベース(CIB)は1つのXMLファイル /var/lib/heartbeat/crm/cib.xmlに記述されています。
CIBにはクラスタ構成 (cib.xmlファイルに記述される変化しない情報) および現在のクラスタ状態についての (変化する)情報の両方が含まれています。そのため、新しいクラスタ構成を作成する場合以外は、このファイルの内容を直接編集することは避けてください。(そのためのコマンドが用意されています。詳細はAPPENDIXあたりに)
HA構成設定
- ホスト設定
vi /etc/hosts
192.168.0.11 server1
192.168.0.12 server2
- 設定ファイルコピー
cp -a /usr/share/doc/heartbeat-2.1.4/ha.cf /etc/ha.d/
cp -a /usr/share/doc/heartbeat-2.1.4/authkeys /etc/ha.d/
vi /etc/ha.d/authkeys
auth 1
1 crc
vi /etc/modprob.conf
options softdog nowayout=0
cl_status hbparameter -p watchdog
vi /etc/ha.d/ha.cf
logfile       /var/log/ha-log
Logfacility local0 # syslog設定
keepalive 2        # 2秒間隔で監視
deadtime 10        # 10秒応答がないとエラー
warntime 5         # 5秒で警告
initdead 10        # 起動時
udpport 694        # 監視udpポート
serial /dev/ttyS0  # シリアルデバイス
baud 19200         # シリアル通信速度
ucast eth2 10.0.0.11 # ユニキャストアドレス。サーバによって変更
watchdog /dev/watchdog # 自ノード監視
auto_failback off
node  server1      # uname-nで表示するサーバ名。/etc/hostsで設定したもの
node  server2      # uname-nで表示するサーバ名。/etc/hostsで設定したもの
# ネットワーク疎通確認用IPアドレス。ルータなど
ping 192.168.1.100
respawn root /usr/lib64/heartbeat/pingd -m 100 -d 5s -a default_ping_set
crm true
vi /var/lib/heartbeat/crm/cib.xml
 <cib admin_epoch="0" num_updates="0" epoch="1" have_quorum="true" cib_feature_revision="1.0">
   <configuration>
     <crm_config>
       <cluster_property_set id="cib-bootstrap-options">
         <attributes>
           <!-- 実行時に設定される -->
           <nvpair id="cib-bootstrap-options-dc-version" name="dc-version" value="2.1.4-node: aa909246edb386137b986c5773344b98c6969999"/>
         </attributes>
       </cluster_property_set>
     </crm_config>
     <nodes><!-- 実行時に設定される --></nodes>
     <resources>
       <!-- pgpoolのグループを追加する -->
       <group id="grp_pgpool">
         <!-- 監視するIPアドレスの設定 -->
         <primitive class="ocf" id="pgpool_if" provider="heartbeat" type="IPaddr">
           <operations>
             <op id="pgpool_if_mon" interval="3" name="monitor" timeout="5" on_fail="restart"/>
           </operations>
           <instance_attributes id="grp_pgpool_if_instance_att">
             <attributes>
               <!-- 仮想IPアドレス -->
               <nvpair id="pgpool_if_attr_ip" name="ip" value="192.168.0.13"/>
               <!-- ネットマスク -->
               <nvpair id="pgpool_if_attr_mask" name="cidr_netmask" value="24"/>
               <!-- ネットワークインタフェース -->
               <nvpair id="pgpool_if_attr_nic" name="nic" value="eth1"/>
             </attributes>
           </instance_attributes>
         </primitive>
         <!-- pgpoolの設定 pgpool-HAを使用してプロセス監視、起動、終了を行う -->
         <primitive class="ocf" id="pgpool_proc" provider="heartbeat" type="pgpool">
           <operations>
             <op id="pgpool_proc_mon" name="monitor" interval="3" timeout="20" start_delay="1m" on_fail="restart"/>
           </operations>
           <instance_attributes id="grp_pgpool_proc_instance_att">
             <attributes>
               <!-- pgpoolの接続設定ファイル等 -->
               <nvpair id="pgpool_conf_path" name="pgpoolconf" value="/usr/local/pgpool/etc/pgpool.conf"/>
               <nvpair id="hba_conf_path" name="hbaconf" value="/usr/local/pgpool/etc/pool_hba.conf"/>
               <nvpair id="pcp_conf_path" name="pcpconf" value="/usr/local/pgpool/etc/pcp.conf"/>
               <nvpair id="log_file_path" name="logfile" value="/usr/local/pgpool/log/pgpool.log"/>
               <nvpair id="pid_file_path" name="pidfile" value="/var/run/pgpool/pgpool.pid"/>
             </attributes>
           </instance_attributes>
         </primitive>
       </group>
     </resources>
     <constraints>
       <rsc_location id="rsc_location_pingd" rsc="grp_pgpool">
         <rule id="rscloc_pingd" score_attribute="default_ping_set">
           <expression id="rscloc_pingd_1_defined" attribute="default_ping_set" operation="defined"/>
         </rule>
       </rsc_location>
       <rsc_location id="rsc_location_grp_pgpool" rsc="grp_pgpool">
         <rule id="rscloc_grp_pgpool_2" score="-INFINITY" boolean_op="or">
           <expression attribute="default_ping_set" id="rscloc_grp_pgpool_2_undefined" operation="not_defined"/>
           <expression attribute="default_ping_set" id="rscloc_grp_pgpool_2_zero" operation="lte" value="0"/>
         </rule>
       </rsc_location>
     </constraints>
   </configuration>
 </cib>
- 起動
/etc/init.d/heartbeat start

# 動作確認
crm_mon -i 5

# サービス登録
chkconfig --add heartbeat
chkconfig heartbeat on
APPENDIX
- cibadmin コマンド
CIBにはクラスタ構成 (cib.xmlファイルに記述される変化しない情報) および現在のクラスタ状態についての (変化する)情報の両方が含まれています。そのため、heartbeat起動後は、cib.xmlは直接編集しないで、cibadminコマンドでリソースの追加、削除を行う必要があります。
- リソース追加
追加するリソースをadd_resource.xml(ファイル名はなんでもOKです)に記述します。
vi add_resource.xml
<resources>
 <group id="grp_pgpool">
  <!-- PgPool-II 192.168.0.14 -->
  <primitive class="ocf" id="pgpool_proc_2" provider="heartbeat" type="pgpool">
    <operations>
      <op id="pgpool_proc_mon_2" name="monitor" interval="5" timeout="20" start_delay="1m"/>
    </operations>
    <instance_attributes id="grp_pgpool_proc_instance_att_2">
      <attributes>
        <nvpair id="pgpool_conf_path_2" name="pgpoolconf" value="/usr/local/pgpool/etc/pgpool_2.conf"/>
        <nvpair id="hba_conf_path_2" name="hbaconf" value="/usr/local/pgpool/etc/pool_hba.conf"/>
        <nvpair id="pcp_conf_path_2" name="pcpconf" value="/usr/local/pgpool/etc/pcp.conf"/>
        <nvpair id="log_file_path_2" name="logfile" value="/usr/local/pgpool/log/pgpool_2.log"/>
        <nvpair id="pid_file_path_2" name="pidfile" value="/var/run/pgpool/pgpool_2.pid"/>
      </attributes>
    </instance_attributes>
  </primitive>
 </group>
</resources>cibadminコマンドでadd_resource.xmlを流し込みます。
cibadmin -U -x add_resource.xml
- リソース削除
削除するリソースを直接指定します。
cibadmin -D -X '<primitive class="ocf" id="pgpool_proc_2" provider="heartbeat" type="pgpool">'
UITableViewの使い方めも その2
UITableViewの使い方めも その2。
iOSでテーブルを表示するUI、UITableViewクラスについてもう少し詳しい使い方。
テーブルビューの表示のカスタマイズ
UITableViewのカスタマイズ
基本的にInterface Builderで設定できるため、xibのほうで設定するのがいいと思います。
Interface Builderを利用しないときは、(void)viewDidLoadなどの、viewのアイテムを初期化する時に設定するようにします。また、UITableViewのメソッドで設定するパラメータは、そのテーブルのセルすべてに適用されます。
- 背景色を設定する
[myTableView setBackgroundColor:[UIColor greenColor]];
- 背景画像を設定する
    // 背景画像
    UIColor* col = [[UIColor alloc] initWithPatternImage:[UIImage imageNamed:@"sample_back.jpg"]];
    [self.myTableView setBackgroundColor:col];
    [col release];
- 境界線の設定
    // 境界線
    self.myTableView.separatorStyle = UITableViewCellSeparatorStyleSingleLine;
    // 境界線の色
    myTableView.separatorColor = [UIColor redColor];
| UITableViewCellSeparatorStyleNone | 境界線なし |
| UITableViewCellSeparatorStyleSingleLine | 境界線あり |
| UITableViewCellSeparatorStyleSingleLineEtched | ipad用? |
- セクションやセルの高さ
    // セクションの高さ
    myTableView.sectionHeaderHeight = 40;
    // セルの高さ
    myTableView.rowHeight = 100;
など。。。
セクション、セルのカスタマイズ
セクション、row単位で表示を変更する事ができます。基本的に、UITableViewDataSourceプロトコルを実装する形になります。
セクション、セルの表示を変更する
- セクションの高さを変更する
-(CGFloat) tableView:(UITableView *)tableView heightForHeaderInSection:(NSInteger)section {
	switch (section) {
		case 0:
			return 40;
		case 1:
			return 60;
		default:
			return 20;
	}
}
- セクションのタイトル
-(NSString*)tableView:(UITableView *)tableView titleForHeaderInSection:(NSInteger) section {
	switch(section) {
		case 0:
			return @"セクション0";
		case 1:
			return @"セクション1";
		default:
			return @"セクション-";
	}
}
- セクションに画像を表示する
UIViewを設定できるため、画像以外も表示可能です。
-(UIView*)tableView:(UITableView *)tableView viewForHeaderInSection:(NSInteger)section {
	UIImageView* view = [[[UIImageView alloc] initWithFrame:CGRectMake(0, 0, 320, 32)] autorelease];
	switch(section) {
		case 0:
			view.image = [UIImage imageNamed:@"header01.png"];
			break;
		case 1:
			view.image = [UIImage imageNamed:@"header02.png"];
			break;
		default:
			return nil;
		}

	return view;
}
- セクションの数(グループの数)
-(NSInteger)numberOfSectionsInTableView:(UITableView*)tableView {
	return 3;
}
- セルの数
- (NSInteger)tableView:(UITableView*)tableView numberOfRowsInSection:(NSInteger)section {
	switch (section) {
		case 0:
			return 2;
		case 1:
			return 3;
		default:
			return 0;
	}
}
- セルの高さ
-(CGFloat) tableView:(UITableView *)tableView heightForRowAtIndexPath:(NSIndexPath *)indexPath {
	switch(indexPath.section) {
		case 1:
			return 40;
		case 3:
			return 60;
		default:
			return 0;
	}
}
- セルの表示を細かく設定する
- (UITableViewCell*)tableView:(UITableView*)tableView cellForRowAtIndexPath:(NSIndexPath*)indexPath {
    static NSString* cellIdentifier0 = @"TableViewCell";
    if(indexPath.section == 0) {
        UITableViewCell* cell = [tableView dequeueReusableCellWithIdentifier:cellIdentifier0];
        if(cell == nil) {
            cell = [[[UITableViewCell alloc] initWithStyle:UITableViewCellStyleDefault reuseIdentifier:cellIdentifier0] autorelease];
            // アクセサリタイプなし
            cell.accessoryType = UITableViewCellAccessoryNone;
            // cell 選択色なし
            cell.selectionStyle = UITableViewCellSelectionStyleNone;
            // cell 透過
            cell.backgroundView.backgroundColor = [UIColor clearColor];
        }

        // tag
        cell.tag = indexPath.row;

        // message
        cell.textLabel.text = @"テキスト";

        return cell;
    }
}
accesoryType
| UITableViewCellAccessoryNone | アクセサリタイプなし |
| UITableViewCellAccessoryCheckmark | チェックマーク |
| UITableViewCellAccessoryDetailDisclosureButton | 詳細ボタン。クリックイベント設定可能 |
| UITableViewCellAccessoryDisclosureIndicator | 「>」マーク |
selectionStyle
| UITableViewCellSelectionStyleNone | 選択色なし |
| UITableViewCellSelectionStyleBlue | Blue |
| UITableViewCellSelectionStyleGray | Gray |
UITableViewCellの各メソッドについては、別にまとめておく。
複数のタイプのセルを使用したサンプル
- table_view_cell_testAppDelegate.h
#import <UIKit/UIKit.h>

@interface table_view_cell_testAppDelegate : NSObject <UIApplicationDelegate, UITableViewDataSource, UITableViewDelegate>{
    IBOutlet UIWindow* window;
    IBOutlet UITableView* myTableView;
}

@property (nonatomic, retain) IBOutlet UIWindow *window;
@property (nonatomic, retain) IBOutlet UITableView* myTableView;

@end
- table_view_cell_testAppDelegate.m
#import "table_view_cell_testAppDelegate.h"
#import "TableViewCellSample.h"
#import "TableViewCellSample2.h"

@implementation table_view_cell_testAppDelegate

@synthesize window, myTableView;


#pragma mark -
#pragma mark Application lifecycle

- (BOOL)application:(UIApplication *)application didFinishLaunchingWithOptions:(NSDictionary *)launchOptions {

    [self.window makeKeyAndVisible];

    return YES;
}


- (void)applicationWillResignActive:(UIApplication *)application {
}


- (void)applicationDidEnterBackground:(UIApplication *)application {
}


- (void)applicationWillEnterForeground:(UIApplication *)application {
}


- (void)applicationDidBecomeActive:(UIApplication *)application {
}


- (void)applicationWillTerminate:(UIApplication *)application {
}


#pragma mark -
#pragma mark Memory management

- (void)applicationDidReceiveMemoryWarning:(UIApplication *)application {
}

/**
 *  セクションの数
 */
-(NSInteger)numberOfSectionsInTableView:(UITableView*)tableView {
	return 3;
}

/**
 *  セクションの高さ
 */
-(CGFloat) tableView:(UITableView *)tableView heightForHeaderInSection:(NSInteger)section {
	switch (section) {
		case 0:
			return 30;
		case 1:
			return 40;
		default:
			return 20;
	}
}

/**
 *  セクションのタイトル
 */
-(NSString*)tableView:(UITableView *)tableView titleForHeaderInSection:(NSInteger) section {
	switch(section) {
		case 0:
			return @"セクション0";
		case 1:
			return @"セクション1";
		default:
			return @"セクション-";
	}
}

/**
 *  セクションごとのセルの数
 */
- (NSInteger)tableView:(UITableView*)tableView numberOfRowsInSection:(NSInteger)section {
	switch(section) {
		case 0:
			return 2;
		case 1:
			return 3;
		default:
			return 5;
	}
}

/**
 *  セルの高さ
 */
-(CGFloat) tableView:(UITableView *)tableView heightForRowAtIndexPath:(NSIndexPath *)indexPath {
	switch(indexPath.section) {
		case 0:
			return 40;
		case 1:
			return 50;
		default:
			return 60;
	}
}

/**
 *  セルの生成と設定
 */
- (UITableViewCell*)tableView:(UITableView*)tableView cellForRowAtIndexPath:(NSIndexPath*)indexPath {
	static NSString* cellIdentifier0 = @"TableViewCellSample";
	static NSString* cellIdentifier1 = @"TableViewCellSample2";
	static NSString* cellIdentifier2 = @"TableViewCell";

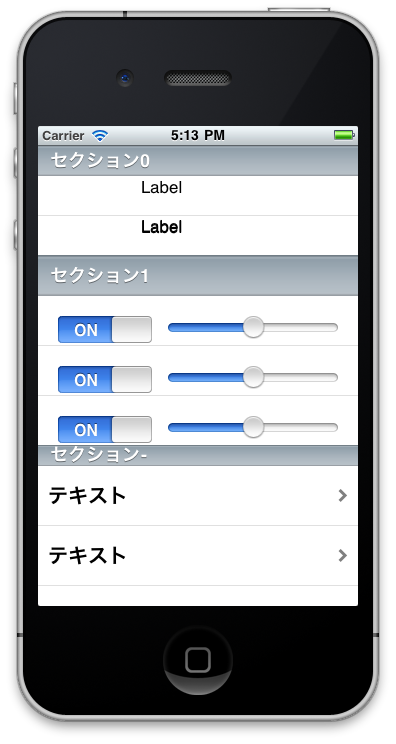
	if(indexPath.section == 0) {
		TableViewCellSample* cell = (TableViewCellSample*)[tableView dequeueReusableCellWithIdentifier:cellIdentifier0];
		if(cell == nil) {
			UIViewController* viewController = [[UIViewController alloc] initWithNibName:cellIdentifier0 bundle:nil];
			cell = (TableViewCellSample*)viewController.view;
			[viewController release];
		}

		// set up cell
		return cell;
	}

	if(indexPath.section == 1) {
		TableViewCellSample2* cell = (TableViewCellSample2*)[tableView dequeueReusableCellWithIdentifier:cellIdentifier1];
		if(cell == nil) {
			UIViewController* viewController = [[UIViewController alloc]initWithNibName:cellIdentifier1 bundle:nil];
			cell = (TableViewCellSample2*)viewController.view;
			[viewController release];
		}

		// set up sell
		return cell;
	}

	if(indexPath.section == 2) {
		UITableViewCell* cell = [tableView dequeueReusableCellWithIdentifier:cellIdentifier2];
		if(cell == nil) {
			cell = [[[UITableViewCell alloc] initWithStyle:UITableViewCellStyleDefault reuseIdentifier:cellIdentifier2] autorelease];
		}

		// set up cell
		cell.accessoryType = UITableViewCellAccessoryDisclosureIndicator;
		cell.selectionStyle = UITableViewCellSelectionStyleGray;

		cell.textLabel.text = @"テキスト";
		NSLog(@"section: %d row:%d", indexPath.section, indexPath.row);
		return cell;
	}

	return nil;
}

- (void)dealloc {
    [window release];
	[myTableView release];
    [super dealloc];
}

@end
- 表示イメージ
